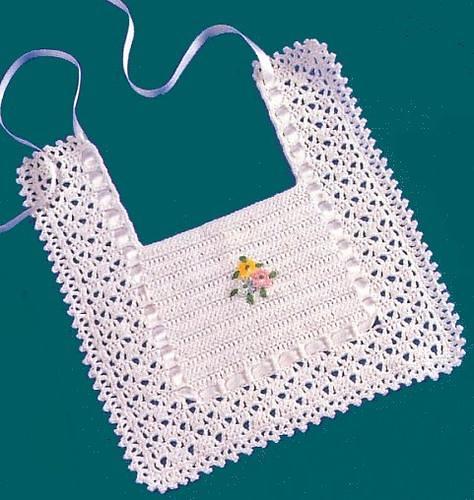
Serve para o frio se for feito em lã e tambem para os dias mais amenos de for feito em linha este Bolero fácil em crochê . O passo a passo você vê AQUI
Starting at the neck: Chain 72 sts. Make 1 d c in 3rd st from hook, * 3 d c in next st; 1 d c in next 4 sts; repeat from * across row, ending with 3 d c in next st; 1 d c in last 2 sts. NOTE: Hereafter when working d c pick up the back loop of the sts and when increasing use both loops of the stitch on the row below. Ch 3, turn.
ROW 2: Skip 2 sts; 1 d c in next st; 5 d c in next st; 1 d c in next 2 sts ; * skip 2 sts, 1 d c in next 2 sts; 5 d c in next st; 1 d c in next 2 sts; repeat from * 12 times. Ch 3, turn. ROW 3: Skip 2 sts, 1 d c in next 2 sts; 3 d c in next st; 1 d c in next 3 sts; * skip 2 sts; 1 d c in next 3 sts; 3 d c in next st; 1 d c in next 3 sts; repeat from * 12 times. Chain 3, turn. ROW 4: Skip 2 sts, 1 d c in next 2 sts; 5 d c in next st; 1 d c in next 3 sts; * skip 2 sts; 1 d c in next 3 sts; 5 d c in next st; 1 d c in next 3 sts; repeat from * 12 times. Chain 3, turn. ROW 5: Skip 2 sts, 1 d c in next 3 sts; 3 d c in next st; 1 d c in next 4 sts; * skip 2 sts; 1 d c in next 4 sts; 3 d c in next st; 1 d c in next 4 sts; repeat from * 12 times. Chain 3, turn. ROW 6: Skip 2 sts; 1 d c in next 3 sts; 5 d c in next st; 1 d c in next 4 sts; * skip 2 sts; 1 d c in next 4 sts; 5 d c in next st; 1 d c in next 4 sts; repeat from * 12 times. Chain 3, turn. ROW 7: Skip 2 sts; 1 d c in next 4 sts; 3 d c in next st; 1 d c in next 5 sts; * skip 2 sts, 1 d c in next 5 sts; 3 d c in next st; 1 d c in next 5 sts; repeat from * 12 times. Chain 3, turn. ROW 8: Skip 2 sts; 1 d c in next 4 sts; 5 d c in next st; 1 d c in next 5 sts; * skip 2 sts; 1 d c in next 5 sts; 5 d c in next st; 1 d c in next 5 sts; repeat from * 12 times. Chain 3, turn. ROW 9: Skip 2 sts, 1 d c in next 5 sts; 3 d c in next st; 1 d c in next 6 sts; * skip 2 sts; 1 d c in next 6 sts; 3 d c in next st; 1 d c in next 6 sts; repeat from * 12 times. Chain 3, turn. ROW 10: Skip 2 sts, 1 d c in next 5 sts; 5 d c in next st; 1 d c in next 6 sts; * skip 2 sts; 1 d c in next 6 sts; 5 d c in next st; 1 d c in next 6 sts; repeat from * 12 times. Chain 3, turn.
ROW 11: SEPARATION: Skip 2 sts; 1 d c in next 6 sts; 3 d c in next st; 1 d c in next 7 sts; ** skip 2 sts; 1 d c in next 7 sts; 3 d c in next st; 1 d c in next 7 sts **; skip the next 3 patterns for the sleeve; repeat between **’s 4 times, this is for the back; skip the next 3 patterns for second sleeve; repeat between **’s twice. (Sleeves will be worked later). Chain 3, turn. ROW 12:Skip 2 sts; 1 d c in next 6 sts; 5 d c in next st; 1 d c in next 7 sts; * skip 2 sts; 1 d c in next 7 sts; 5 d c in next st; 1 d c in next 7 sts; repeat from * across row. Chain 3, turn. ROW 13: Work in the same way, but each pattern has: 1 d c in next 8 sts; 3 d c in next st; 1 d c in next 8 sts. Chain 3, turn. ROW 14: Work in the same way but each pattern has: 1 d c in next 8 sts ; 5 d c in next st, 1 d c in next 8 sts. Chain 3, and turn. ROW 15: Work in the same way but each pattern has: 1 d c in next 9 sts; 3 d c in next st; 1 d c in next 9 sts. Chain 3, turn. ROW 16: Work in the same way but each pattern has: 1 d c in next 9 sts; 5 d c in next st; 1 d c in next 9 sts. Chain 3, turn. ROW 17: Work in the same way but each pattern has: 1 d c in next 10 sts; 3 d c in next st; 1 d c in next 10 sts. (No increase) Chain 3, turn. ROW 18: Do as row 17. (No increase). ROW 19: Do as row 17. (No increase). ROW 20: Do as row 17. (No increase). Break yarn.
SLEEVES: Tie yarn at the 2nd d c at the underarm edge on the first pattern; chain 3 sts; 1 d c in next 6 sts; 3 d c in next st; 1 d c in next 7 sts; * skip 2 sts; 1 d c in next 7 sts; 3 de in next st; 1 d c in next 7 sts ; repeat from * once more. Chain 3, turn.ROW 2: Skip 2 sts; 1 d c in next 6 sts; 3 d c in next st; 1 d c in next 7 sts; * skip 2 sts; 1 d c in next 7 sts; 3 d c in next st; 1 d c in next 7 sts; repeat from * once more. Chain 3, turn. ROWS 3-4-5-6-7: Repeat row 2. Break yarn. Sew up sleeve.
BEADING AT NECK EDGE: Tie yarn at the neck edge; chain 4 sts; * skip 1 st; 1 d c in next st; chain 2, repeat from * around neck. Break yarn. TRIMMING: With a # 2 steel hook and using the silk, single crochet all around the sweater. 2nd ROW: Picot Edge: * Make 1 s c into the next 4 sts; ch 4; slip st back into the first chain, repeat from * all around sweater. Finish the cuff of the sleeve the same way.
BOOTIES: Instep and Sole: Using the #3 bone hook, chain 10 sts. Make 1 s c into 2nd st from hook and in each of the remaining 8 sts. Ch 1, turn. Work 1 s c into each stitch. Work 7 rows more of s c. Chain 31 sts; join with a slip st to corner of instep. Make 9 s c along side of instep; 9 s c across toe; 9 s c along 2nd side of instep and 1 s c into each of the 31-chain sts, Work 9 rows more of s c into each st. Fasten off and break yarn. Upper part: Tie yarn at center of chain and make 1 d c in each st around (40 d c). Ch 4, turn. Next row: Skip 2 sts, 1 d c in next 2 sts, * 3 d c in next st, 1 d c in next 3 sts, skip 1 st, 1 d c in next 3 sts; repeat from * across row, ending with 1 d c in next 3 sts (5 shells). Ch 4, turn. Next row: Skip 2 sts, 1 d c in next 2 sts, * 3 d c in next st, 1 d c in next 3 sts, skip 2 sts, 1 d c in next 3 sts; repeat from * across row, ending with 3 d c in one st, 1 d c in next 3 sts. Ch 4, turn. Repeat this last row 4 times. Break yarn. Sew up sole and back of bootie. Trim with silk as on the sweater. Run ribbon through the d c row.
BONNET: Using the #3 bone crochet hook: Chain 4 sts; join with a slip st, to form a ring. 6 s c into the ring. 2nd round: 2 s c into each stitch. (12 sts). Mark the beginning of the round with a colored thread, so as to keep it even. 3rd round: * 1 s c in next st; 2 s c in next st; repeat from * around once. 4th round: * 1 s c in next 2 sts; 2 s c in next st; repeat from * around once. Having 1 more stitch between each increase, keep increasing 6 sts on a round until you have 12 sts between each increase (84 sts). Ch 3 sts, turn.
ROW 1: Make 1 d c in next 68 sts; chain 3, turn. ROW 2: Make 1 d c into each stitch picking up the back loop only across row. Chain 3, turn. Repeat Row 2 until the piece measures 4 inches from the back of the bonnet (edge of last s c row). FRONT FRILL: Chain 3 sts; 1 d c in next st; 3 d c in next st; 1 d c in next 2 sts, * skip 2 sts; 1 d c in next 2 sts; 3 d c in next st; 1 d c in next 2 sts, repeat from * 8 times more. NEXT ROW: Ch 3, turn, skip 2 sts; 1 d c in next st; 5 d c in next st; 1 d c in next 2 sts; * skip 2 sts; 1 d c in next 2 sts; 5 d c in next st; 1 d c in next 2 sts; repeat from * across. NEXT ROW: Ch 3, turn; skip 2 sts; 1 d c in next 2 sts; 5 d c in next st; 1 d c in next 3 sts; * skip 2 sts; 1 d c in next 3 sts; 5 d c in next st; 1 d c in next 3 sts; repeat from * across row. Break yarn.
NECK BAND: S c along one side front, across back sts and across 2nd front. Make 3 rows of s c into each stitch. Break yarn. Trim with the silk as the sweater on the frill of the bonnet.
Cobertor de berço EM CROCHE
Sobre uma base de 240 cor. teça a manta seguindo o diagrama.
MEDIDA DA MANTA DE BERÇO- 170 CM DE ALTURA POR 107 CM DE LARGURA
carr 1- 13 corr, 1 pa na 5ª corr a contar da agulha, 2 pa, 2 cor, 1 pa na 3ª corr, 3 pa
carr2 - 5 corr, 1 pa no 4º pa, da carr anterior,3 pa, 2 cor,1 pa na corr inicial.
carr3 e todas as impares- 3 corr, 1 pa em cada corr da carr anterior (2 pa) , 1 pa, 2 corr, 1 pa no ultimo pa do bloco de 4 da carr anterior , 3 pa
carr4 e todas as impares- 5 corr, 1 pa no 4º pa, da carr anterior,3 pa, 2 cor,1 pa na corr inicial. Repetir as carreiras 3 e 4 até chegar no tamanho desejado.
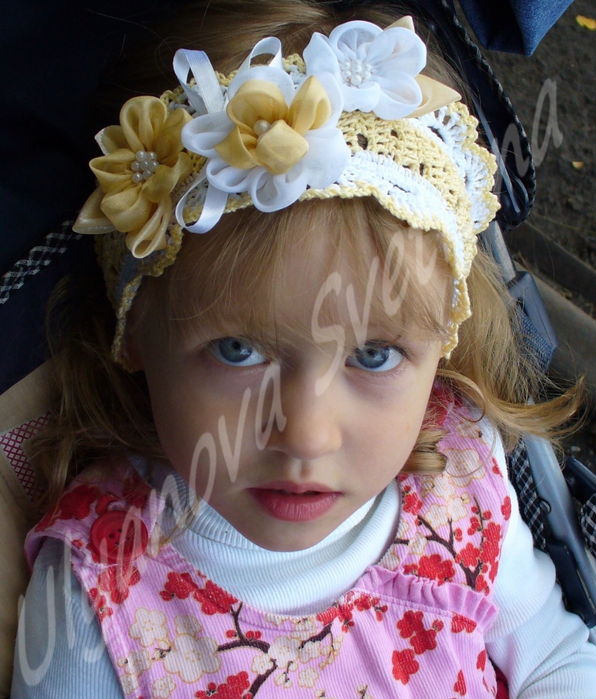
Carreiras laterais em leque:
Carr 1 -Faça uma carreira de pb a toda volta do trabalho, vai chegar num dos bicos do trabalho, na lateral mais larga do trabalho , faça 3 corr,1pb no 2º pb, *6 pad ( ponto alto duplo)no 2º pb ( todos no mesmo pb) , 1pb no 2º pb , 2 corr , 1 pb no 3º pb* repetir de * a 8 até o fim.
Carr 2 - 3 corr para virar, 1 pb no 1 pa a seguir,*3corr, 1 pb no 1 pa a seguir*, repetir de * a * até o final. arrematar , emendar o fio no outra lateral e fazer a carreira de leques lá tambem.
Se quiser colocar miçangas no trabalho lembre de colocar a quantidade total necessária, enfiando na linha antes de começar o trabalho, sendo que serão 4 miçangas para cada 2 carreiras do corpo da tiara e seis miçangas para cada leque das laterais
símbolos de crochê
ABREVIATURAS
CORR - CORRENTINHA
CARR CARREIRA
PA- PONTO ALTO
MPA- MEIO PONTO ALTO
PBX- PONTO BAIXISIMO
PB- PONTO BAIXO
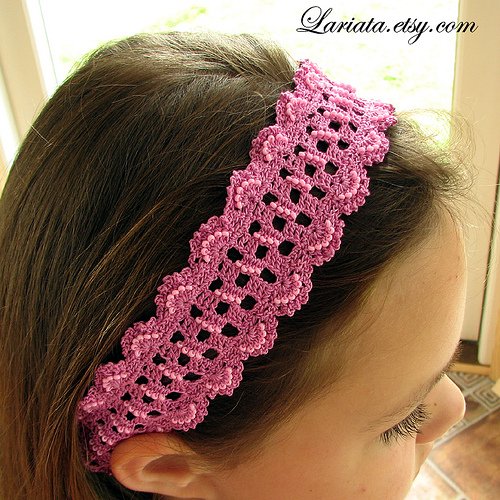
carr 1- 11cor,1 pa na 5ª corr a contar da agulha, 1 pa em cada corr até o final
carr 2 -3 corr,2 pa, 2 corr 1 pa no 3º pa, 2 pa
carr 3 - 3 corr,1 pa em cada pa até o final (repetir esta carreira em todas as carreiras impares)
carr 4 -3 corr,2 pa, 2 corr 1 pa no 3º pa, 2 pa (repetir esta carreira em todas as carreiras pares)
Fazer ate chegar ao tamanho desejado e aí comece fazendo nas duas laterais o ponto de leque:
carr 1 e 2 - faça 2mpa na lateral de cada pa e 2
mpa em cada espaço das corr até o final. Na proxima carr faça
mpa sobre mpa
carr 3 - * 6 cor, 1 pb no 5º mpa * repetir de * a * até o fim
carr 4 - 3 corr, *1 pa, 1 corr* repetir até ficar um leque com sete pa, prender com 1 pb no meio do proximo arco de corr (LEQUE FEITO), fazer 1 pa na primeira cor do proximo arco e IR FAZENDO LEQUES ATÉ O FINAL
carr 5 - *3 CORR 1 PBX NA CORR QUE FICA ENTRE OS PA, 3 CORR 1 PBX NA PROX CORR QUE FICA ENTRE OS PA* REPETIR ATÉ O FINAL ARREMATAR E FAZERA CARREIA DE LEQUES NO OUTRO LADO DA BASE INICIAL.
DECORAR COM FLORES E FITAS
Flor
PRA QUEM NÃO SABE LER GRÁFICOS ensino no video abaixo.
https://youtu.be/FBtmRaYHO9c
ABAIXO VÍDEO DA PROF SIMONE ENSINANDO UMA TIARA DE CROCHÊ
RECEITA DA Prof. SimoneDA SOLA DOS SAPATINHOS DE BEBE
EM CROCHE EM TODOS OS TAMANHOS
OS SAPATINHOS SÃO FEITOS COM LINHA ANNE OU LÃ INFANTIL QUE TENHA A MESMA ESPESSURA DA LINHA ANNE E AGULHA PARA CROCHE 1,75 MM Os tamanhos serão determinados pelo numero de correntinhas iniciais, então fica assim:: Tamanho prematuro - iniciar com 12 correntinhas Tamanho recem nascido - iniciar com 14 correntinhas Tamanho 1 a 3 meses - iniciar com 17 correntinhas Tamanho 3 a 6 meses - iniciar com 20 correntinhas Tamanho 6 a 9 meses - iniciar com 22 correntinhas Tamanho 9 a 12 meses - iniciar com 24 correntinhas Faça as correntinhas na quantidade necessária para o tamanho que voce quer. Aí inicie o trabalho em pontos altos da seguinte forma para cada tamanho: Para os tamanhos prematuro e recem nascido trabalhe da seguinte forma: A partir da quarta correntinha, faça 6 pontos altos juntos no primeiro e no ulltimo ponto da carreira segunda carreira 1 ponto alto para cada ponto da carr de base e 2 pontos altos juntos para cada 1 dos 6 pontos juntos que foram feitos de cada lado terceira carreira- 1 ponto baixo, para cada carreira de base. Para os tamanhos 1 a 3 meses e 3 a 6 meses trabalhe da seguinte forma: A partir da quarta correntinha, faça 6 pontos altos juntos no primeiro e no ulltimo ponto da carreira segunda carreira 1 ponto alto para cada ponto da carr de base e 2 pontos altos juntos para cada 1 dos 6 pontos juntos que foram feitos de cada lado terceira carreira- 1 meio ponto , para cada carreira de base. Para os tamanhos 6 a 9 meses e 9 a 12 meses trabalhe da seguinte forma: A partir da quarta correntinha, faça 6 pontos altos juntos no primeiro e no ulltimo ponto da carreira segunda carreira - 1 ponto alto para cada ponto da carr de base e 2 pontos altos juntos para cada 1 dos 6 pontos juntos que foram feitos de cada lado terceira carreira- 1 ponto alto, para cada carreira de base. No calcanhar e frente do pe, faça 1 ponto alto, 2 pontos altos juntos, 1 ponto alto, seguindo os aumentos da carreira anterior
MATERIAL: PINGOUIN BAMBINO - 1 novelo de cada uma das cores: 002 (branco), 1339 (sereno), 1506 (mikonos), 272 (alamanda) e 4607 (nativa); ag. para crochê PINGOUIN nº 2½.
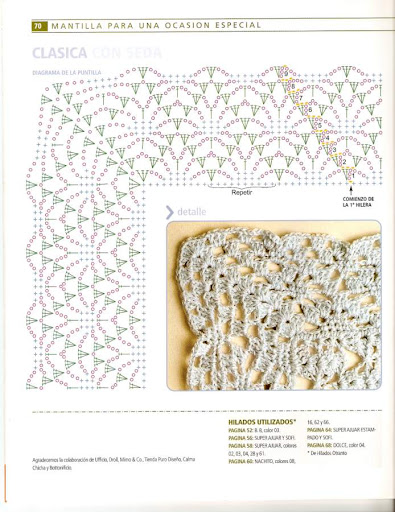
PONTOS EMPREGADOS:Correntinha (corr.).Ponto Baixíssimo (p.bx.) - introduzir a ag., 1 laç., puxar o p. e passá-lo diretamente no p. da ag. Ponto Baixo (p.b.) - introduzir a ag., laç., puxar o p. e com outra laç. rem. todos os p. Ponto Alto (p.a.) - 1 laç., introduzir a ag. e puxar o p., 1 laç., rem. 2 p. e com outra laç. rem. todas as laç. na ag. Ponto Alto Alongado (p.a. alongado) - trabalhar em p.a., introduzindo a ag. no p. correspondente da 2ª carr. anterior. Ponto Alto Alongado pela Frente (p.a. alongado pela frente) - trabalhar em p.a., introduzindo a ag. pela frente do p. correspondente da 3ª carr. anterior. Tira em Ponto Fantasia - seguir o gráfico 1. Biquinho - seguir o gráfico 2.
AMOSTRA: tira em ponto fantasia = 6,5 cm de largura aproximadamente.
EXECUÇÃO
A manta é formada por 13 tiras em ponto fantasia, unidas entre si.
Tira - trabalhar seguindo o gráfico 1, fazendo a corr. de montagem, 1ª e 6ª carr. com o fio na cor contrastante e as 2ª, 3ª, 4ª, 5ª, 7ª e 8ª carr. com o fio na cor branco. Fazer as tiras alternando as cores dos fios das 1ª e 6ª carr. na seguinte sequência: 1ª tira - sereno, 2ª tira - nativa, 3ª tira - alamanda, 4ª tira - mikonos, 5ª tira - sereno, 6ª tira - nativa, 7ª tira - alamanda, 8ª tira - mikonos, 9ª tira - sereno, 10ª tira - nativa, 11ª tira - alamanda, 12ª tira - mikonos e 13ª tira - sereno.
MODO DE ARMAR
Unir as tiras seguindo a ordem de execução. Com o fio na cor branco, trabalhar 1 carr. em p.b. ao longo das laterais e fazendo o biquinho ao longo das beiradas inferior e superior.
Dia 12 de Setembro comemora-se o Dia Internacional do Crochê. Parabéns a todas as crocheteiras que com suas mãos tecem maravilhas. trabalho da alemã Susanna Bauer.
Vamos iniciar pela ponta dos dedos do pé trabalhando de forma circular.
Faça 5 correntinhas e feche. 1° Carreira: faça 8 pontos altos. 2° Carreira: faça 2 pontos altos em cada ponto da carreira anterior: totalizando: 16 pontos altos. *Repita o esquema, ou seja, acrescente 2 pontos altos em cada ponto da carreira anterior, até atingir a largura do pé.
Ao atingir a largura do pé, faça carreiras sem aumentar pontos conforme o esquema a seguir (Parte1).
PARTE 2
Trabalhe apenas metade do círculo sem aumentar pontos. Para fechar o calcanhar, vire do avesso e feche com ponto baixo.
Imagem: Passo a passo – parte 2
PARTE 3
Para fazer o cano da meia, prenda o fio na emenda do calcanhar e trabalhe de forma circular com o ponto que voce escolher e faça até a altura desejada. E pronto!


 Achei este passo a passo da Circulo aqui

 Imagem: Passo a passo – parte 2